Quantcast
Channel: Yudiz Solutions Ltd.
Viewing all 595 articles
Browse latest View live

Shopify – Assign Featured Image to Pages

$
0
0

Overview

Featured images allow for better customization if you have to build unique custom header images for specific posts and pages or set thumbnails for special features of your theme.

Shopify lets you add featured images for products and collections.
But unlike WordPress, there is no option of adding featured images to pages in Shopify!

Now, what if we want different images for different pages?

While customizing the theme, you may require to have such functionality to assign featured images to pages.

shopify-featured-image-image3

Best way to get it done takes a little modification in template file code!
Do not worry if you don’t know about development. Just follow the given steps:

Step – 1 Upload image to the dashboard

Add a new image you want to assign to the page. Remember you have to upload the image of the same name as page handle.
For example, If I want to assign an image to About us page that has URL “https://abc.myshopify.com/pages/about-us”, I will upload an image named “about-us.jpeg”

Note: Here you can upload an image of any extension but remember to keep each image with the same extension as we are using it dynamically.

Step – 2 Modify theme file for adding featured image to single page

Place below code in theme.liquid file

{% if template.name == "page" and page.handle == "about-us" %}
        {% capture myimage %}{{ page.handle }}.jpeg{% endcapture %}
            <img src="{{ myimage| file_img_url: 'medium' }}"/>      
        {% endif %}

Above snippet checks, if the current page is of page template and is “About us” page then will display the image you have uploaded for the page.

That’s it! We’re done for the single page!

Step – 3 Modify theme file for adding featured image to all pages

Now I have uploaded images for each page and want to assign each page a different image!
shopify-featured-image-image1

No worries you can do it for any number of pages!
Change 1st line of above code with following:

{% if template.name == "page" %}

Horray… You created the featured image for each page!

shopify-featured-image-image2


A case study on game automation testing

$
0
0

Overview

A game tester will test video games continuously before the final build is released for the company whom they are working with video games production company. We also say beta tester & game testers have to test many versions of the game until the final version is closed. They have to play games the number of times from start to end on every new test builds to uncover bugs or errors within the game. Without the game tester, bugs and errors would abound in the game, it has the possibility of making them unplayable and decreases the reputation of the game maker company.

Challenges in Mobile Games Testing

  • Performance of the game may change across all hardware and software combinations.
  • Many inspector tools cannot be found on the game application.
  • Any locator method like Xpath, id, class name and others cannot be identified in the application.
  • Many device and resolution for Android which needs to test on.
  • User Interface in the game is very fast as compared to mobile applications so synchronization with the scripts and gameplay is very difficult.
  • Image comparison library will not work on mobile devices.
  • Automation testing in emulators does not produce many bugs for game apps so need a more real device to test.
  • Many games use direct screen access information of ActiveX/OpenGL bypass Operating system-level services.

game automation testing_image1(Image credit: Testdroid)

Things To Think When Automating Mobile Game Testing

Let’s understand how automation in testing (as opposed to manual testing) can increase and improve the development process.

VALUE AND WEALTH

Nothing matters if you go for automation or manual testing, you will need to follow wealth and resources: people, infrastructure, time, tools and training. The testing method is totally depending on the size of the project and/or application, automation testing will provide a good return on your investment. Let’s understand how it will help you in terms of costs. For Example, once test cases are created, automated test cases can run many times again at no extra cost and it can be faster completed than manual tests. It can reduce the time required to run the same tests over and over from weeks to hours. This is a time saver that affect directly to your project cost. We can say Test automation in-game is cost-saving.

Professional automatic testing software system could be an answer to a standard problem: the way to produce high-quality, strong and reliable software system with the ever-growing complexness of technology and under huge competitive pressure. automatic software testing could be a cost-efficient answer to the present problem. It gives three benefits to our business:

  • Efficiency
  • Effectiveness
  • Less time

Comparison of test automation frameworks

game automation testing_image3(Image credit: Testdroid)

Robotium

Robotium is an automation framework that supports a native and hybrid application. It makes powerful and automatic BB ( Black Box ) UI tests for android app. With using Robotium, developers can write test scenarios and span multiple activities.

UIAutomator

UIAutomator provides a good way to test user interfaces. It makes automated test cases that can be executable on real devices and emulator. It has a viewer, which is a graphical user interface tool to scan and analyze the user interface components of the android application.

Espresso

Espresso is an open-source test automation framework, and available for developers and tester to remove their UIs. It has a small API and is also predictable, understandable and easy to learn on the Android instrumentation framework. You can quickly write brief and reliable User interface tests with Espresso.

Calabash

Calabash is a cross-platform automation framework for iOS and Android hybrid application. A syntax which is used in the Calabash is easy to understand and even for non-technical people can create and execute on both of these mobile platforms.

Appium

Appium is a native tool for mobile test automation framework for mobile apps of iOS and Android native, hybrid and mobile web. By using Selenium’s WebDriver, it internally interacts with iOS and Android application with the use of JSONWireProtocol.

Appium is an HTTP server which is written in Node.js and it has the ability to create and handle multiple WebDriver sessions. It can listen to commands from the server and start tests on the device. It is the same as the Selenium server that gets the request from selenium client libraries.

Appium is a good option for both application and games because apps and games are similar on both platforms ( Android and iOS ) and the same testing scripts can be applied. Users can write tests using their favorite development tools, programming languages like Java, PHP, Python, C#, JavaScript and Objective-C and also many others.

Conclusion

Testing decides to certify success in the landscape of mobile games. But if we do not properly plan to test then it takes up to 20 to 40% of your development activities, in this case, it would also increase the cost in your budget which you have planned for the game. In simple words, automation in the testing area is the latest, and potentially greatest tool in the QA area. To ascertain that testing is highly efficient, covering the area of today’s mobile ecosystems and device models.

Kotlin Coroutines – Beginning of a new async era?

$
0
0

Overview

Do you often get entangled with asynchronous programming and its callbacks? Welcome, this post is for you. If we list down all the background processes that execute while using an app, we might end up with a book. 😀

coroutines-image1

Starting from network calls upto fetching any data from a database, all the processes must execute in background/asynchronously as we do not want to block the main/UI thread. We generally use AsyncTask/RxJava to deal with background threads. There is a common problem associated with them: We need callbacks from background tasks to handle the main thread accordingly. This breaks the synchronous execution flow (a common reason to run into blunders).

Fortunately, Kotlin has something called coroutines to make this a lot more simple.

What are coroutines?

They pretty much work as await and async in C#. In simple words, coroutines make asynchronous programming behave like synchronous. The execution on main thread waits for background task to complete before executing next lines of code. As I always prefer practical approach to understand any topic, let me switch to it very quickly.

Practical

People often find using coroutines a bit tricky. I’ll try to represent how to use coroutines on an initial level in as simple way as I can. Let’s consider a common situation : Network calls.

Here’s what I’ll do : I’ll hit an API which returns list of countries with all the details and I’ll list country names with capitals using a recycler view. The thing to look out for is that the code will be written synchronously but the main thread will wait for API to return results before filling out the recycler view.

Note: I’ll use retrofit for handling network calls but in order to stick to the topic, I’ll not get into details of it. I’ll just point out the changes required in the regular process.

Let’s start!

Add gradle dependency for coroutines as follows:

implementation 'org.jetbrains.kotlinx:kotlinx-coroutines-android:1.0.1

Add dependency for retrofit’s coroutines adapter. I’ll get into details of it when it’ll start making more sense.

implementation 'com.jakewharton.retrofit:retrofit2-kotlin-coroutines-adapter:0.9.2'

Here, I would like to clear some concepts of coroutines.
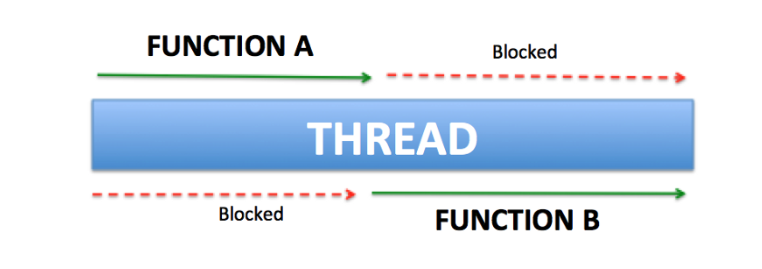
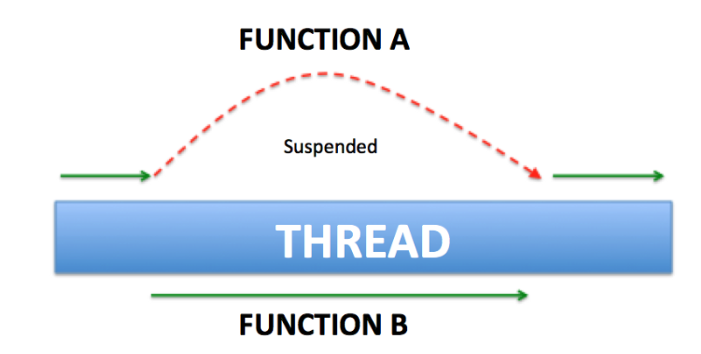
Coroutine code is executed only in coroutine scope. We need to add suspend keyword with the function that contains the code. This does the actual magic. It stops a function until another gets executed. Remember, it is not same as block. Blocking a function will stop it while suspending a function pauses it. The following image will help to clear out the confusion, if any.

coroutines-image2

coroutines-image3

We’ll use launch( ) method of GlobalScope class of coroutine library which handles all this stuff under a hood. We’ll supply Dispatchers.Main as its argument. This makes sure that the code in the block is allowed to touch the hierarchy of views in main thread.

GlobalScope.launch(Dispatchers.Main) {
   val request = Retrofit.getRetrofitInstance().getCountries()
   val response = request.await()
   pb.visibility = View.GONE
   response.body()?.let {
       rv.adapter = Adapter(this@MainAct, it)
   }
}
@GET("/rest/v2/all")
fun getCountries(): Deferred<Response<List>>

As we need to wait for API call to fetch results, we have to use Deferred object as its return type. Only deferred object have a property to await (request.await( ) here). This is reason we added a dependency for coroutines adapter earlier. It makes retrofit to return the results of Deferred type. Don’t miss out to add call adapter factory while configuring retrofit.

fun getRetrofitInstance(): Service {
   return Retrofit.Builder()
       .baseUrl(BASE_URL)
       .client(
           OkHttpClient.Builder()
               .connectTimeout(60, TimeUnit.SECONDS)
               .readTimeout(60, TimeUnit.SECONDS)
               .writeTimeout(60, TimeUnit.SECONDS)
               .build()
       )
       .addConverterFactory(GsonConverterFactory.create())
       .addCallAdapterFactory(CoroutineCallAdapterFactory())
       .build().create(Service::class.java)
}

Note : If you are dealing with any other async function except network calls and you need Deferred object as return type, you can use anko library. It has something called bg{ } block which might be helpful.

To summarize the process that underwent here, API is hit which returns Deferred object as return type. The main thread waits for it to complete using await( ) method of Deferred object before executing UI operations i.e. hiding progress bar and filling out recycler view.

Here is the output:

coroutines-image4

You can get your hands on the github repository for this demo using a link attached with this post.

Conclusion

Coroutines are a very powerful tool to make the code sensible, easy to decipher and compact. They can even sometimes help to get rid of boilerplate code. I personally consider them as a very important step in developer-friendly asynchronous programming.

That’s all for now. Thank you for your attention..!

Yudiz Solutions Featured in Clutch’s Research of App Developers in India

$
0
0

Here at Yudiz Solutions, we are India’s leading product engineering company. Our team represents some of the best minds in the industry, and we deliver an inspiring experience through our Mobile, Web, and AR/VR design. Our creative thinking, technical mastery, and innovation has allowed us to build strong brands for small businesses, midmarket, and enterprise businesses.

clutch-badge

We are excited to continue our growth through our partnership with Clutch, a reviews platform for business-to-business service providers. We believe that Clutch is the place to be if you are a tech company looking to gain more organic leads and expand your business. We are very proud to be included in Clutch’s research of top augmented reality developers in 2019!

Clutch uses a thorough examination system to determine which companies are the best of the best on their site. For example, they took into account our firm’s aggregate customer relationships, online presence, and overall ability to deliver service before we were determined one of the top providers in our area. It is an industry standard to be featured on Clutch and we view our partnership with them as a testament to our ability to deliver exceptional products for our clients.

We have 16 total reviews on our Clutch profile so far, and each and every review we’ve received has helped our business grow. Take a look at some of our most recent pieces of feedback:

“I was blown away by the talent of their developers.” – CEO, PX Kids Interactive, Inc.

“Our feedback is always well-received and considered.” – Owner & Developer, Digital Agency

“The team outperforms their competition in quality, price, and speed.” – Director, ClearCommon Ltd.

In addition to our profile on Clutch, we are also very excited to speak on our partnerships with The Manifest and Visual Objects. Both of these companies are sister sites of Clutch and function to build links between businesses and their potential clients. They accomplish this by helping users navigate the buyer’s journey and add value to firms listed on their site by making them more likely to appear in organic search queries. We take pride in being featured on The Manifest’s list of top blockchain companies in India for 2019. Being featured on these sites proves to us that Yudiz Solutions has accomplished a lot over the past few years and we hope to continue to be privileged enough to be featured on more lists such as this one for top mobile app development companies on Visual Objects.

Overall, we are very pleased with our relationship with Clutch as we continue to grow and expand as a leading firm in the development and emerging technologies markets.

Let’s Dive in the World of Machine Learning

$
0
0

Overview

Hey all Tech Guyz !!

In the era of modern technologies like AI (Artificial Intelligence), ML (Machine Learning), Robotics and IOT. Today we are going to put the focus on one of the most trending technology i.e, Machine Learning and will also cover other aspects related to it like how it works and why it’s important, where it can be used, and many more. So let’s begin.

I am sure you’ve heard about the new Tesla car with autopilot. Right? And of course, you’ve read the word “Machine Learning” for more than 300th time of the year. But still, you don’t exactly understand how it all works and what it is. Then Hold down because this post is for you.

Do you change your way while the conversation with co-workers or friends while they are talking about machine learning? Then Let’s change it out!

Introduction to Machine Learning

Machine learning is one of the subfields of Artificial intelligence (AI). The goal of machine learning generally is to understand the structure of data and fit that data into models that can be understood and utilized by people.

Data is a key part of machine learning.

There are some generic algorithms that can tell you something interesting about a set of data without you having to write any custom code specific to the problem. Instead of writing code, you feed data to the generic algorithm and it builds its own logic based on the data.

Surprised ?

Let’s have a look at example,

One kind of Such Algorithm is a classification algorithm. It can put data into different groups. The classification algorithm is used to recognize the handwritten numbers that can also be used to classify emails into spam and not-spam without changing the line of code.

Used the same algorithm but it’s fed with different training data so it comes up with the different classification logic.

In short we can say , “Machine learning” is an umbrella term that covers lots of such kinds of generic algorithms.

Why Machine Learning is Important ?

Recent years have shown that Machine Learning can be used to automate a lot of different tasks that were thought of as tasks that only humans can do like Image Recognition, Text Generation or playing games.

As recently in 2014, most of the experts thought it would be 10 years before a machine beat the world’s best players at Go (Trending Game).And, DeepMind (Machine Learning ) proved them wrong.

Machine Learning is going to have huge effects on the economy and living in general. Entire work tasks and industries are going to be automated and the job market will be changed forever.

All of these means it’s possible to quickly produce the models that can analyze bigger, more complex data and deliver faster, more accurate results. Such models helps organization for better chance of identifying profitable opportunities — or avoiding unknown risks.

Types of Machine Learning :

Machine learning is divided into 3 categories,

1. Supervised Learning :

In supervised learning, suppose to particular algorithm we fed data with images of cats labeled as cat and images of dog labeled as the dog. By being trained on this data, the supervised learning algorithm should be able to later identify unlabeled cat images as the cat and unlabeled dog images as the dog.

A common use of supervised learning is to use historical data to predict statistically likely future events.

2. Unsupervised Learning :

In unsupervised learning, the data is unlabeled, so the learning algorithm is left to find the same pattern among its input data. As unlabeled data are more abundant than labeled data, methods that facilitate unsupervised learning are particularly valuable.

Unsupervised learning is commonly used for transactional data.

3. Reinforcement Learning :

Reinforcement Learning deals with how an agent takes actions in an environment to maximize the earning of reward.

Perfect example for it would be video games which are full of reinforcement cues(indications).

Reinforcement Learning saw huge successes in the last few years in the context of game theory with an example being the Dota Bot from OpenAI.

Why Python is best for ML ?

As we know python is the easiest language to Understand . But ,

along with that, it is the language which is the collection and code stack of various open source repositories and packages which are developed by people.

You Want to work with images  –  numpy, opencv, scikit

You Want to work in text  –  nltk, numpy, scikit

You Want to work in audio  – librosa

You want to solve machine learning problem  – pandas, scikit

You want to see the data clearly  – matplotlib, seaborn, scikit

You want to use deep learning  –  tensorflow, pytorch

You want to do scientific computing  –  scipy

You want to integrate web applications  – Django

You want to dance –  hold on do it after reading the blog 😂

Where ML is Used ?

  • FINANCIAL SERVICES – To detect insights and fraud in transactions.
  • GOVERNMENT – For public safety and minimize identity theft and frauds.
  • HEALTHCARE – To directly detect some change in body through some sensors and analysis.
  • MARKETING AND SALES – To analyze previous purchase history and on the basis of it increasing user shopping experience and many more.
  • OIL AND GAS – To Find new energy sources , predicting refinery sensor failure.
  • TRANSPORTATION – Analyzing the data to identify the patterns and trends is key to the transportation industry, which relies on making the routes more efficient and predicting the potential problems to increase profitability.

Why Machine Learning is the Future ?

Google says “Machine Learning is the future,” and the future of Machine Learning is going to be very bright.

As we humans are becoming more addicted to machines, we’re moving to the new revolution that’s taking over the world, and that is going to be the future of Machine Learning.

Inventions of the new robots and the best example for it would be “Sophia” .

‘ Future is Machine Learning and Machine Learning is the future ! ‘

How Machine Learning Works ?

Still Confused? Don’t worry, Soon I will post a blog on how Machine Learning Algorithm actually works.

Conclusion

Yayyyyyy ! Now I am pretty sure you have that much knowledge of Machine Learning, that you can proudly share it with your friends and company staff who aren’t aware of it.

I hope this blog satisfied you and will help you in these era of Machine Learning.

Please Share it, Comment your ideas on it, And Stay tuned for upcoming blogs 👍

Learn how to do Animation on Counter by Scrolling in both directions

$
0
0

Overview

We have a requirement in one of our projects to have counters that should be animated when it is within the viewport as well as on scroll in both directions. As we all know that the simplest way is to go to Google and search for some script that makes our job easy, we also did the same but we were unable to search for the same. Now, we don’t have any other option rather than generating it on our own.

Prerequisite

To initialize, we looked up for the script that help us to know that the particular element is within the viewport(user’s visible area of the site) and we succeeded in finding the one i.e Waypoints Inview. We have used that to implement this counters. Most primary requirement for this jquery library. You can download waypoints scripts from here.

counter-image1

Implementation

1) Implement the script for counter

Mostly we begin the easiest task that we are able to sail through. So we begin with script for the counter increment.

HTML:

<div id="inview-example" class="counters">
	<div class="common-box">
		<div class="counter-num">
			<span class="timer" data-count="9">9</span>
			<span>+</span>
		</div>
		<div class="counter-text">Years Experience</div>
	</div>
	<div class="common-box">
		<div class="counter-num">
			<span class="timer" data-count="2200">2200</span>
			<span>+</span>
		</div>
		<div class="counter-text">Successful Projects</div>
	</div>
	<div class="common-box">
		<div class="counter-num">
			<span class="timer" data-count="80">80</span>
			<span>%</span>
		</div>
		<div class="counter-text">Repeated Clients</div>
	</div>
	<div class="common-box">
		<div class="counter-num">
			<span class="timer" data-count="200">200</span>
			<span>+</span>
		</div>
		<div class="counter-text"> Employees</div>
	</div>
</div>

Script:

$('.timer').each(function () {
     var $this = $(this);
     var val = $(this).data('count');
     jQuery({ Counter: 0 }).animate({ Counter: val }, {
         duration: 1000,
         easing: 'swing',
         step: function () {
             $this.text(Math.ceil(this.Counter));
         }
     });
});

2) Implement waypoints

To begin with waypoints, we need to include scripts as stated in prerequisite. Then we created a function for it and initialized that function on load of the page.

function inviewExample() {
     var $example = $('#inview-example');
     var inview;

     if ($example.length) {
       inview = new Waypoint.Inview({
         element: $('#inview-example')[0],
         entered: function(direction) {
         // counter script that we have implemented in previous step
}
 }
$(window).on('load', function() {
    inviewExample();
});

3) Result

You can download the source code from here. The final result is as below.

animated-counter

Conclusion

I hope that this blog might be useful to you. I have implemented this with the help of my colleagues Richa and Amitsinh.

Truly Decentralized Voting System powered by Blockchain (Version 1.0)

$
0
0

Overview

Think what would happen if the voting system is 100% transparent, no central authority owning it, no changes allowed to be made to the ledger, voters identification remaining confidential and lastly the entire voting process remaining fully transparent. At Yudiz, we have developed a system having similar functionality.

We will cover the following Topics in today’s Blog:

Voting Blog V0.1_image1

Blockchain Technology and Online Voting

To develop a truly decentralized system, we need to first devise a system that ensures voter registration that would guarantee the anonymity of voters and also ensuring that everyone casting a vote were authorized to do so and that no one would be able to vote more than once in the same election and also ensuring that vote given by the voter cannot be changed, which can only be achieved through blockchain.
A Centralized system solves this problem by using an official census and polling stations. But in the case of a decentralized system, we cannot afford to rely on this process.

Blockchain technology allows secure management of public/private ledgers where all transactions are verified and securely stored on the blockchain network.

Voting Blog V0.1_image2

By using the blockchain technology a truly decentralized voting system can be implemented.

At Yudiz we had developed a system with the use of Hyperledger platform which provides all the features described above.

Why we used Hyperledger?

Voting Blog V0.1_image3

Hyperledger is a platform on which we can code & develop blockchain applications. For doing so, it provides various types of frameworks and tools.

In our voting system, we have used hyperledger fabric framework and hyperledger composer tool because different participants in a voting system like administrator, election authority, candidate and voters do some interaction with the system – so each of these needs to have some type of digital identity. These identities really matter as they determine the exact permission over system resources and access information which is in a blockchain network. Since it provides this great functionality, which is why we use hyperledger fabric framework.

Let’s look at how our system works.

The flow of our system

Step 1: Voter’s Authentication

We need to make sure that each voter is authenticated and eligible for the vote. For that, we have used Employee Id and Employee Email. When a voter enters his/her employee id, we will verify the voter with a simple OTP verification.

Step 2: Issue Identity

Identity is a very crucial part of this system. Each participant in this system needs Identity to interact with the network. Even the administrator holds an Identity with a limited level of permission.

This Identity is encapsulated in an X.509 digital certificate and generated by a hyperledger fabric network. This identity has a .card extension which holds the credentials for connecting to hyperledger fabric networks like connection profile for connecting to the business network, user ID and enrollmentSecret of the user. This Identity file is unique for every user.

Each of these issued identities has exact permission depending on the type of participant. Like administrator can issue identity to voters but cannot vote himself. The voters can only vote once, the administrator can not read data of the voting transaction. It is due to hyperledger blockchain feature. This transaction data remains hidden forever by the rule defined in the Smart Contract.

Once a voter is verified, Identity is issued to the voter with only permission to give vote once. That Identity card file is sent to voters’ email address. Despite the fact that email has a low level of security, the voter can feel confident about the authenticity,
security and transparency of the voting process.

Step 3: Voting Process

Voting Blog V0.1_image4

Now it is time for voting.

When the voting process starts, the voter needs to upload an identity card file. After voter had uploaded card file, the voter will get connected to the blockchain network with his/her identity and can vote if identity is valid.

Step 4: Result

Result of the voting process is fully transparent. Whenever the voting process will end every voter can see who is the winner of the election.

Voting Blog V0.1_image5

Conclusion

I hope this blog will help you to understand the flow of a voting system on the blockchain with more transparency and more security. We are continuously upgrading our system that will be very easy to use for the user. If you have any suggestions in this system then please drop your comments here. We will really appreciate your suggestions.

I would like to thank Meet Siraja for being so supportive to complete this blog.

That’s all for now. Thank you for reading this blog. Signing off.

Truly Decentralized Voting System Powered by Blockchain (Version 2.0)

$
0
0

Overview

If you are following us from our previous blog, it’s only plausible that you really are interested in knowing more about the decentralized voting system.

Voting Blog V2.0_image1

If you haven’t seen the first part of this blog and missed the amazing decentralized Voting system v1.0 then here it is.

After developing the first voting system, we Blockchain Developers of Yudiz came up with another solution for a decentralized voting system, which is better and more efficient than the previous one. So hang on, while we walk you through the details.

Today, we would be covering the following topics:

Flow of the Updated System

If you have read our first blog on the decentralized voting system than you already are familiar with the concept of Hyperledger and why we use it for developing the decentralized voting system.

This is the flow of how our new system works.

Step 1: Voter Authentication

Voting Blog V2.0_image2

First of all, we need to make sure that each voter is a member of our organization and are eligible for voting. At our organization, each employee holds an ID-Card that is bound with a unique RFID (Radio Frequency Identification). RFID is a form of wireless communication that uniquely identifies an object or a person. So what we did is we bounded emails of each and every employee to their respective RFIDs.

Step 2: Issue Identity in Blockchain Network

When an employee scans their ID-Card on RFID scanner, a unique identity is generated inside our hyperledger network for that particular user. The identity contains an enrolment secret for the user and a unique code is then sent to the email of employees. This generated unique code is signed by the enrolment secret code of employee’s identity using public key cryptography. Only one unique code is generated for one user.

Step 3: Voting Process

Voting Blog V2.0_image3

Lets Vote now.

To give a vote to the candidates, employees just need to enter a unique code that he/she has received in their email. After that, the hyperledger network will verify if the code is valid or not. If it is, the voting page will be loaded and post that the employees would be able to cast their vote to their favourite candidates.

Step 4: Result

Voting Blog V2.0_image4

The after-effect of the entire voting process is it provides complete transparency. At whatever point the voting process ends, all the voters would be able to see the outcome of the election.

Why we need a Decentralized Voting System

For now, we have developed this system for our internal use only. However, if we look at the current voting scenario, the EVM machines are blamed with many rumors such as it is centralized, vote count mistakes in EVM and also tampering with the EVM machine.

The other major challenge that the current system hosts are the challenge of appearing in person on the assigned date & venue. If you are in a different state for work reasons or other and you won’t be able to make back to your respective city then, in that case, you won’t be able to cast your vote then.

It is because the government doesn’t want to make all data centralized. The reason behind doing so is to avoid the risk it posts to the system if it is made non-centralized.

Given that, Blockchain is the best possible solution that can solve the problem by making the system decentralized.

Video:

Conclusion

I hope this will help you to understand the concept of decentralized voting system. As we have said in our previous blog we are continuously upgrading our system that will be very easy to use for the user.

I would like to thank Yuvraj Upadhyay for being so supportive to complete this blog.


Pros and Cons of amp from web designer view

$
0
0

Overview

First of all, AMP stands for “Accelerated Mobile Pages”. This tool is developed by google AMP Team, which makes website loading speed faster in mobile devices.

As Google changes the criteria for website crawling scenario. The website which is made in AMP or using the AMP tool that will be ranked good in the Google crawl list. So now in current time, people are aware of using AMP in their website.

But it is not that easy thing to do or not that hard level rocket science to work with AMP.
AMP is working with some own rules and regulation in a combination of HTML.

Following are some Pros and Cons(not actually cons but not used to things) of AMP.

Love about AMP

1) Load Speed

Pros&Cons_image1

The main advantage of AMP is that it speeds up the page loading speed. This will be done by asynchronies javascript packages which are used by AMP. This will help you to not creating leverage browser cache. Also, all component of js are stored on google can network so also decrease the server load timing.

2) No more Javascript

Pros&Cons_image2

One of the major reason for leverage browser caching is that use of custom javascript or jQuery. Where in case of AMP it is strictly not allowed to directly implement it. Amp is also using javascript but it predefines in boilerplate js which is called Threw Async Method.

3) Load only what you want (no extra code of js)

AMP provides library-based js module so you can use that enough code what you want for. For example, if you want to create amp-carousal then you just include amp-carousal.

4) Meaningful error

Pros&Cons_image3

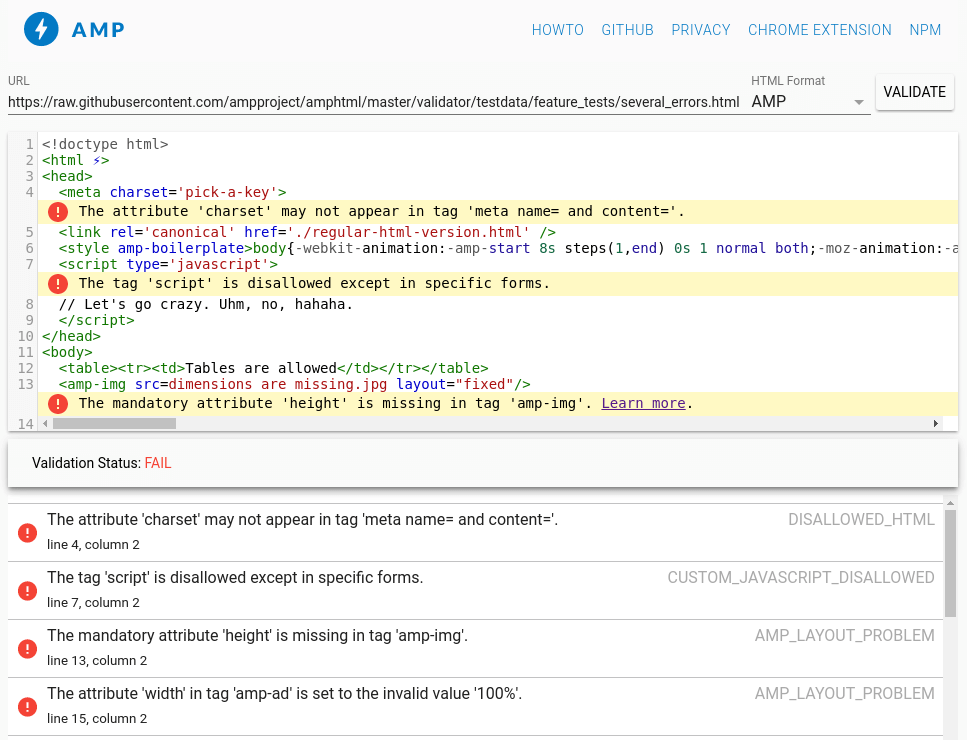
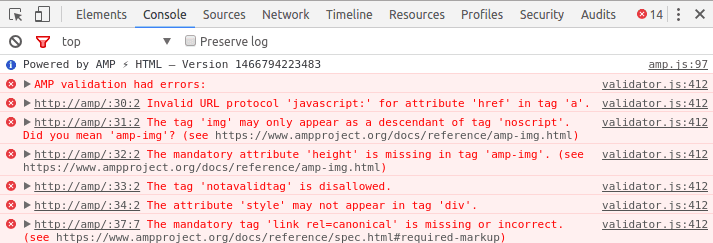
As the view of a web designer, it is sometimes hard to find some third-party element not functioning because of the error indication. In AMP, case it is very easy to catch that thing. AMP validation fail indication is clear about what is missing or what is wrong.

For example: if you are using amp-image and forgot to define “height” element in HTML then, it directly points out that thing, where is the problem or what should be or what shouldn’t be there.

Pros&Cons_image4

5) Predefine functionality to the integration of methods or events

As we know AMP has own defined js so it also has some predefined events and methods. These are pretty much capable of easily making a basic level of task like (add, remove, toggle classes or tap, scroll, etc events). Also, you hear some plenty of additional components are available which is working pretty fine. (Like-: image-slider, parallax, 3d modal, amp-accordion, etc.)

Hate about AMP

1) No follow w3c validator

Pros&Cons_image5

As we know the w3 validator is known for check or validate basic HTML markup where some type of code is not validated in case of improper HTML and HTML hierarchy. In case of AMP, AMP provides some custom tag type which definitely not validates the w3 validator-rules. So if you use amp then you have to forget w3 validator.

2) Replace some html tags

Pros&Cons_image6

As discussed in above point amp replaces some HTML tag in their own format so for any HTML designer which habituated with HTML tags, they face a bit problem to do coding as fluently as they are doing.

For example: img to amp-image, video to amp-video, audio to amp-audio.

3) Specific syntax should be followed (Force Code)

Pros&Cons_image7

In general in HTML code you are free to write some attribute if you want, but in AMP, we have to follow some tag with specific attribute to complete amp validation.

For example, if you are using amp-image and not using height attribute in amp-image tag then it fails the AMP validation and generates failure error as height is mandatory.

4) No custom javascript

Pros&Cons_image8

As we discuss this type of thing in as pros of AMP but in the situation of complex customization of data or any method operation, AMP is not suitable for that thing to validate AMP standards.

5) No external CSS

As AMP is swift in speed, one of the major parts is the use of an internal CSS. But when website design and pages are more than normal website we have to use an external style sheet to every page, unfortunately, that is not possible through Amp. You can write your own CSS in the head of the page using “style amp-custom” tag.

6) No responsive grid framework

Yes, this is what the amp hated mostly. AMP do not support any external js and CSS so on one stage it is completely impossible for responsive if you have no media query knowledge. Also, AMP is valid upto 50kb internal CSS so you cannot copy and paste entire bootstrap or other responsive framework CSS. Solution for this is also possible you have to filter that CSS’s unnecessary code and make it under the boundary of AMP CSS validate rules.

7) Double navigation code

As we know bootstrap and other responsive frameworks generally provide an auto toggle navigation for mobile usage, but unfortunately, AMP does not provide that thing. If you want toggle menu in the smaller resolution you have to use for that. So finally you have to come up with two separate code, one is for Desktop menu (general horizontal menu) and the second one is for Mobile or Toggle Menu (especially for smaller resolution or mobile devices).

8) Not support local font integration

As we know the font is a major component of web design, in AMP pages it will be used by some verified URL which is mentioned below as using. From there you can find the font and integrate via that URL but the problem is that you can not use any generated web font by assigning the local path of that directory in your project. You can also use another URL via @fontface but that should be http or https.
https://www.ampproject.org/docs/design/responsive/custom_fonts

Conclusion

I hope that this blog might be useful to you. I will shortly update about “how to use the bootstrap grid on AMP” in the same channel, so stay in touch.

Record HTTP requests logs in JMeter using Manual Proxy

$
0
0

Overview

In this blog, we are going to discuss a very powerful testing tool called JMeter. This tool has some exciting features, one being the ability to record HTTP requests/responses being sent/received from an Android/iOS device. So let’s get started!!!

Introduction of JMeter

JMeter is a Performance & Load testing tool for web applications developed by Stefano Mazzocchi of Apache Software Foundation. Later it was redesigned to enhance the GUI and to add functional-testing capabilities.

Uses

It can be used to simulate a heavy load(by sending multiple requests) on a server, group of servers, network or object to test its strength or to analyze overall performance under different load types. The results of the performance testing can be visualized in the form of graphs.

Pros

  • Ability to load and performance test many different applications/server/protocol types (HTTP, FTP, SOAP etc.)
  • Full Multithreading framework allows concurrent sampling by many threads and synchronous sampling of different functions by separate thread groups.
  • And many more

Cons

  • While simulating heavy load, it can consume a lot of memory
  • It mainly works only for web applications
  • Does not support JavaScript or Ajax

Download and install JMeter and its certificate on the Android/iOS device:

  • Download Apache JMeter from here. (Download the zip file from the Binaries section)
  • Extract the Zip file
  • Send ApacheJMeterTemporaryRootCA.crt file present in the “bin” folder, to your Android or iOS device and install the Certificate.

(Refer to the below video for the step by step process.
Note: The process for the iOS device is similar to that of Android)

Run JMeter and Start recorder

To run JMeter, First, go to the bin directory of JMeter and:

For Windows: Double click on the jmeter.bat file then run the JMeter
For Mac:

  • Open terminal
  • Goto bin directory using the “cd” command (Example: $ cd /apache-jmeter-4.0/bin)
  • Run JMeter using the command: $ sh jmeter.sh

This will open the GUI for JMeter

To add JMeter recording template:

  • Go to File -> Templates…
  • Select Recording option from the select template dropdown.
  • Click on Create a button
  • Click HTTP(S) Test Script Recorder (Check Port number as this will be used while setting up the proxy in the Android/iOS device)
  • Click on the Start button that would start recording the HTTP requests
  • On the Root CA certificate… popup, click OK button.

jmeter-image1

Set proxy in Android & iOS Device

Follow the below steps to set proxy in Android/iOS device
Note: Both the Android/iOS device and the device running JMeter should be on the same network.

For Android:

  • Open WiFi settings
  • Long press on connected WiFi
  • Select Modify network option
  • Click on the Advance option
  • Select proxy type as Manual
  • Enter the IP address of the device running JMeter in the Proxy Server field (To find the IP address – For Windows: Open cmd -> type IPCONFIG and press enter -> Select the IPv4 address. For MacOS: Open Terminal -> type IFCONFIG and press enter -> Select the inet address). Example – 192.168.0.1
  • Enter Port number as in the recorder of the JMeter recording template. Example – 8888

jmeter-image2

For iOS

  • Open Settings app
  • Click on WiFi option
  • Click on Create a button
  • Click on Info button on connected WiFi
  • Click on Configure Proxy option
  • Select Manual option
  • Enter the IP address of the device running JMeter in the Proxy Server field (To find the IP address – For Windows: Open cmd -> type IPCONFIG and press enter -> Select the IPv4 address. For MacOS: Open Terminal -> type IFCONFIG and press enter -> Select the inet address). Example – 192.168.0.1
  • Enter Port number as in the recorder of the JMeter recording template. Example – 8888
  • Click on the save button

(Refer to the below video for the step by step process)

Observing API Logs with an example

  • Open application in the Android/iOS device
  • Use any function in the application which might send a request to the server.
  • Goto the View Results Tree listener in JMeter to view the logs. All API requests are recorded in JMeter. (refer to the screenshot below).

jmeter-image3

jmeter-image4

Conclusion

Hence we can conclude that Game testing is not as easy as we think and not enjoying at all for game tester because it is a repetitive task and to do the same thing constantly for a long time with full concentration and this is a hard job. And the very challenging task for the game tester is to reproduce the same scenarios again and again during testing the game and during verifying solved bugs. So game testing is also a hard work it is not as easy as people think.

Yudiz Solutions Pvt. Ltd. Featured as a Development Leader on Clutch!

$
0
0

We are excited to announce that we’ve been featured on Clutch as among the top development companies in India! In a particularly competitive space of the top mobile game developers, we are proud to be recognized as among the leaders of this category.

Clutch_image1

Clutch is a B2B ratings and reviews firm based in the heart of DC who are dedicated to connecting businesses of all sizes to solutions providers that will help them overcome their next business hurdle. Using a unique methodology, Clutch ranks firms based on their technical capabilities, market presence, and verified client reviews. Our 16 reviews on Clutch have attributed a lot to our success as we’ve obtained an average 4.8-stars out of 5-stars. Here’s a look at one of them:

Clutch_image2

Clutch_image3

We’re also featured on their two sister-sites, The Manifest and Visual Objects.
On The Manifest, we are recognized for another one of our services as among the top 100 augmented reality companies. The Manifest categorizes business profiles by service industry and location. Prospective clients can compare prices and look at company bios to help ease the process of finding a perfect match for their next business partner.
Visual Objects is a platform for creative agencies to display their work and our profile can be found among the top mobile app developers! This allows businesses to visualize a future project to gain a better sense of the style of work service provides.
We would like to thank our amazing clients for their support throughout the years and we thank Clutch for recognizing us as a 2019 industry leader. Since 2009, we’ve committed ourselves to the growth of our clients by providing them with quality deliverables. We understand the importance of how app development can play a pivotal role to the development of a business and we are proud to be recognized for our successes. We look forward to continuing this kind of effort in the future!

Build Your First DAPP on Tron Blockchain

$
0
0

DAPP on Tron_1

Overview

Have you ever heard about Tron Blockchain? Tron was founded by Justin Sun and launched in May 2018 on Mainnet. The Tron code base was originally forked from Ethereum and it uses a fork of the Solidity language, which is a programming language for developing a smart contract on Ethereum Blockchain. As a result, Ethereum token standards and smart contracts are compatible with Tron ecosystem.

We will cover the following topics today:

DAPP on Tron_2

Introduction To Tron Blockchain

DAPP on Tron_3

The Tron Blockchain is an ambitious project that aims to decentralize the web through Blockchain Technology. TRX(Troinix) is the official cryptocurrency of Tron Blockchain. Unlike Bitcoin and Ethereum TRX cannot be mined. But we can buy TRX on major cryptocurrency exchanges like Binance.

Tron has already achieved more Transaction Process System(TPS) than Ethereum and Bitcoin. Its network can handle 2000 transactions per second whereas the Bitcoin can handle 6 TPS and Ethereum can handle 25 TPS respectively.
(Source: https://tron.network/)

Let’s see how Tron Blockchain works.

How Tron Blockchain Works?

To understand how the Tron Blockchain works, we first have to understand its architecture.

DAPP on Tron_4

The Tron Architecture consists of Three layers.

Storage Layer:

A Distributed Storage protocol that consist blocks storage, state storage, and GRPC.

Core Layer:

This layer consists of Smart Contract, Account Management, Wallet API, Consensus and SDK. Java is the designated language for development for smart contracts.

Application Layer:

A Developer can easily develop DApp and customized wallets in Tron Network using Application Layer.

TRON uses Delegated Proof of Stack (DPoS) consensus algorithm. So, Tron Network is governed by 27 Super Representatives that are voted by TRX holders. This 27 Super Representatives validates the blocks and keeps running the Tron Blockchain. Super Representatives are rewarded in TRX for that.

So, we got enough knowledge for developing the Decentralized App Tron Blockchain. Let’s build DApp on Tron Blockchain.

How To Build Decentralize App on Tron Blockchain?

Tron is an open source blockchain platform that lets developers build smart contracts and DApps.

Steps to developing DApp on Tron Blockchain:

  1. Creating Smart Contract.
  2. Setting up TronLink for Deployment of Smart Contract.
  3. Deploy Smart Contract on Mainnet or Testnet. (here we will deploy our smart contract on Tron test network called Shasta.)
  4. Developing a client-side application for interacting with our smart contract like fetching data from smart contract and writing data to smart contract.
  5. Integrating TronLink to our application so that users can interact with a smart contract using their accounts. (As we are developing very simple DApp, I will not explain this part in my blog.)

Let’s start from scratch.

Step 1: Creating Smart Contract

Just like Ethereum, Tron smart contracts written in Solidity language. If you want to learn solidity Click Here, this is the perfect place to start learning solidity.

Here we will write a very simple smart contract that will set and get a string message to a smart contract. Here is the code,

<script src="https://gist.github.com/meetsiraja/148eb5807da6d08a756851717faff0ef.js"></script>

By reading the above code, you can easily understand what this function will do. The postMessage function will set the string in a message variable that we had passed as an argument. The getMessage function will get that string that is stored in the message variable.

Step 2: Setting Up TronLink

TronLink is a bridge that connects your DApps to Tron blockchain. For deploying smart contract into test network you need to install TronLink Chrome Extension. You can download it from here.

DAPP on Tron_5

After Setting up a wallet password and account you need some TRX to deploy the smart contract. You can get it from this Shasta Faucet. Go to the website and enter the account address that you just created then click submit. You will get 10,000 TRX token for development purposes.

Step 3: Deploying Smart Contract on Test Network

Now it’s time to deploy a smart contract on the Tron network. There are a variety of ways available for deploying a smart contract on Tron blockchain. You can deploy using TronBox (Which is just like a Truffle framework), from Tron wallet-cli and Tron IDE.

We will use tronsmartcontract.space for compilation and deployment. Go to the website and hit the Compile button. After compilation succeeds press the Deploy it button. Don’t forget to change the network mode in TronLink. You can change the Network mode by going to Settings > Switch Mode > Shasta Testnet from TronLink. Then one confirmation popup will appear from TronLink. Press Accept. You will see the contract address when your contract is successfully deployed. Keep it somewhere, we will use that later.

Now your contract is deployed on Tron Test Network.

Step 4: Node Application for Interacting with Smart Contract

You can get the code from this GitHub link. Enter below command in your terminal.

$ git clone https://github.com/YudizBlockchain/Tron-DAPP.git

You have to change a few things in the index.js file. After downloading the code open index.js file. You have to enter your account address, a private key of your account (you can get it from TronLink > Menu > Export Account) and address of the smart contract where it is deployed.

After that, you need to install dependencies. For that open terminal and got to the path where your code is then run below command,

$ npm install

When all modules are installed type command below in a terminal and go to 127.0.0.1:8001 in your browser.

$ node index.js

Now you can test the application and functions of a smart contract.

DAPP on Tron_6

Executing the function will take some time for confirmation on the blockchain. You can check all the transactions of your smart contract. Go to Tron Blockchain Explorer and enter the address of your smart contract. You can see all transaction and it details.

Congratulations!

DAPP on Tron_7

You have successfully deployed Tron DApp onto Tron Testnet.

Conclusion

I hope this will help you to understand the Tron Blockchain, it’s architecture and DApp development process. If you have any issues, please leave your comment below.

That’s all for now. Thank you for reading this blog.

Machine Learning Can Predict Your Emotions!

$
0
0

Overview

Hey Techies, we all learned a few aspects of machine learning in our previous blog but did you know that a machine can predict your emotions too?

machine learning_image1

And on a prediction basis, it overlays funny emoji of that emotion/mood on your face!
Do you think that is possible with Machine Learning? 😲

machine learning_image2

Yes, it is possible. So hold on and let’s see how!
So first, let’s clear out on a few things that how machine learning works if you are new to machine learning. I recommend you to refer my previous blog on machine learning concepts to get a clear understanding.
https://www.yudiz.com/lets-dive-in-the-world-of-machine-learning/

Overview of how ML works

In Machine Learning the dataset is divided into 2 parts.

  1. Training dataset
  2. Test dataset

machine learning_image3

Size of the training dataset is always higher as we have to first train the model on the training dataset for predicting true and accurate results.

Now you guys might be wondering, how this exactly works?

machine learning_image4

So let’s begin, but again before we move ahead, I am assuming that you have the basic knowledge of Machine Learning.
Don’t have? Don’t worry something is there for you here https://www.yudiz.com/lets-dive-in-the-world-of-machine-learning/

How Emotion Detector Works?

Basically, as we know in machine learning, firstly we have to train the model, so in the same way here we have to provide the user with some images with different moods as the training dataset to train the model.
For ex:
python face_capture.py –emotion_name smile –number_of_images 200

This command will open the camera, and will capture the 200 images of the faces of the user, and will label it as smile dataset.

In the same way for different moods,
python face_capture.py –emotion_name sad –number_of_images 200

So by doing the above process, you have given the machine the dataset of images with different moods from which it can differentiate the emotions.

machine learning_image5

As you can see it starts detecting the face and upon detection, it captures the image and saves it in the folder of defined emotion name. (This process is done through OpenCV library in python, that will detect the face from the frame and will capture the image of the face) After capturing the images of different moods it’s time to create a different dataset on the basis of results obtained.

machine learning_image6

So let’s run the script to create a dataset, python dataset_creator.py
The dataset_creator.py includes some functions to reduce the size and change the dimensions of the stored images, to apply the train_test_splitter (dividing the train and test dataset), and then generating the dataset with labels.

machine learning_image7

Now we have the train and test dataset, which will be saved in a particular folder. So now it’s time to train our model on the dataset to make accurate predictions.

machine learning_image8

So, let’s start training the model. The training process includes some activation functions like,

  • Linear function
  • Sigmoid
  • Tanh
  • ReLU
  • Leaky ReLU, etc.

Basically, activation function decides whether the neuron should be activated or not on the basis of the weights and bias. The Neural Network without the activation function is just a linear regression model.

Now let’s run the script to train the dataset, python trainer.py In an ideal case, the use of the sigmoid activation function would be efficient but here in the trainer.py, I have used Relu and Softmax function as they support multiple classes.

How A Model gets trained?

The process of model training is similar to how we get trained for our exams. Everything in the training depends on Neurons!
Neurons?? 😒

machine learning_image9

Don’t worry, we are softmax, etc not moving into these neurons.

But just for the sake of Understanding, keep in mind that multiple neurons create one Neural Network. Soon I will be writing a blog on neural networks.

In the process of training, each neuron has its own weight(w) and bias(b), and all the neurons produce some results. The main goal is to find the ideal W and B values for all neurons or W and B vectors for a layer. And In the final run, given a test data vector(set) X, we calculate the w*X+b value for subsequent layers and get a final predictive result.

Every time the weights and bias get updated in the training process through the forward and backward propagation until the model is trained perfectly.

machine learning_image10

Such W and B, are then fitted into functions like sigmoid, softmax, etc to get the predicted result.

Yayyy!! Now we have a trained model that can predict human emotions.

machine learning_image11

Now, let’s run the trained model

machine learning_image12

Here we go – Emoji Predictor

machine learning_image13

Conclusion

So, now I am pretty sure that you understood the importance and the usage of machine learning through this blog.
Please share it with your friends to alert them for the new era of machine learning and its power, and share your reviews as it will not burn your calories 😄

What is NAS?

$
0
0

Overview

NAS stands for Network Attached Storage. It is a storage server which is used especially for file-sharing across the network. It removes sharing and storage responsibilities from the main server and makes performance much better.
As it is network attached hence it supports various file sharing protocols which makes sharing across network very easy. NAS server is the best option for secure storage.
There are many ready-made NAS servers which are available in the market such as:

  • Synology
  • Qnap
  • Buffalo
  • Western Digital
  • ixsystems

Either you can purchase NAS from the companies mentioned above or you can build your own. Yup! That sounds amazing building your own NAS server is the best experience ever had if you have enough curiosity to learn new things and want to build your own NAS server.
So now you have many questions coming in your mind like how to build NAS server? What are the things I need? What will be the cost? How to configure? So let’s get some more information about NAS and it’s building steps.

Why you need NAS?

There are plenty of reasons why you should have a NAS server at your home or office or whatever the place you are working or your data will be there and you need that data all the time available secure.

1. NAS is easy to set-up

Setting up NAS is very easy to set up, for that there is no high-level knowledge required. You just need to plugin the drives in the NAS, and provide power supply and network connectivity according to your requirement either wirelessly or wired. There is no need to attach all hardware things because in ready-made NAS everything will be there like RAM, processor, etc. And in a fraction of time, your data will be in the NAS.

2. Good for a long run in the context of time and money

If you are using any cloud service right now which is suppose having 2TB storage, you are paying approximately 80$ to 100$ per year for limited storage. But if you invest 500$ to 700$ once for creating a huge NAS. There is no limit of storage, it is flexible and expandable.

3. Provides good security

Every NAS has some different encryption techniques by which a user can encrypt drives while creating volumes. User can keep it from the public internet. And especially in organizations, you can establish centralized NAS and can easily avoid providing access to every individual PCs which can make a huge effect on security in a positive way.

4. No need of ISPs outages

Normally NAS server is connected with wifi or gigabit/megabit connection. So there is no need of any ISP crap and if your cloud is in maintenance and still there is no problem if you configured your NAS properly then it can tolerate few failures easily.

5. It offers increased storage space

The most irritating issue that we all are facing nowadays is the lack of storage capacity. Suppose there is a YouTuber and he has 4 drives on his desktop and wants to transfer that 4K videos for editing and uploading because there are many people working with him.
So instead of transferring those file using some external HDDs, NAS comes with a better option. It is expandable and can give access 24*7 so it saves a huge amount of time and improve the productivity of work.

6. Very easy file sharing

As this is network attached storage it supports different file protocols according to the operating system like SMB(Server Message Block, Windows file shares), CIFS/NFS(Network File Shares, UNIX file shares) and AFP(Apple file shares). So it is easy to make file-sharing among various operating systems.

The number is nothing to show a list of reasons as you’ll buy and start using NAS server or you’ll build a NAS server than you’ll come to know there are a lot more reasons to use NAS server. NAS server has its own operating systems provided by the organization if you want to manage something or want to make a change in the configuration you can access the UI using the normal web browser.

Operating systems for NAS

Let’s see the list of NAS operating system:

  • FreeNAS
  • NAS4Free
  • OpenMediaVault (OMV)
  • Openfiler
  • Rockstor
  • Nexenta Community Edition
  • Amahi
  • CryptoNAS

Each has its own functionalities, pros & cons. Today we will see about the FreeNAS operating system that is developed by ixsystems. We’ll see about the version, features.

FreeNAS

As mentioned above FreeNAS is an operating system for NAS which is totally free and open source that is developed by ixsystems. They provide FreeNAS OS with each of their products. You can download and use that as well as it is free and open source. It is based on FreeBSD and OpenZFS system.
If you want to download the FreeNAS OS you can download from here!

Let’s talk about the features of FreeNAS:

  • Easy File sharing
  • Data Protection
  • Backup Services
  • Encryption
  • UI

Easy File sharing: As mentioned above it supports file-protocols according to the operating system so file sharing is very easy. It also supports iSCSI(Block Sharing) and WebDev method of sharing and iSCSI supports VAAI(vShpere Storage APIs Array Integration) of vmware and also support Microsoft ODX and Microsoft server 2008 and 2012 R2 clustering.

Data Protection: When it’s about data protection there is OpenZFS that is specially designed for data integrity from top to bottom. For individual protection there is RAID and FreeNAS supports different levels like RAID level 0, 1, 5, 6 and 10.
Volumes of FreeNAS screen each possible parity arrangement list based on how many drives are selected by the user at the time of the creation of volume.

Backup Services: As it supports various operating systems for file-sharing it also supports the backup services for different operating systems. FreeNAS provides backup services like:

  • Windows Backup
  • Rsync
  • Apple Time machine
  • TrueOS Life Preserver

Periodic Snapshot is the best feature of data backup and restoration. FreeNAS capture snapshots of every single dataset at the given interval of time (that interval time will be decided by the admin) and for a given amount of time i.e, 1 month 2 weeks, etc.
In case of any failure, admin can restore the data from that snapshot. And snapshot can avoid cryptolocker and ransomware so easily.

Encryption: According to 1 article of FreeNAS forums “FreeNAS is the first and only open source project to offer encryption on ZFS volumes”. Admin has the option of full drive encryption at the time of the creation of volume and that encryption is AES-XTS and that can be hardware accelerated.

User Interface: When you installed FreeNAS on your custom build NAS or you purchase NAS from any vendor at the time of configuration there is command line interface which is available but if you don’t have that much good command grip in Linux then there is option of User Interface which is accessible through web browser of system.
It has very good user-friendly legacy web user interface which is now updated in last update 11.2 that latest updated UI is developed using AngularJS. Figures given below shows the new and old web GUI of FreeNAS.

New UI FreeNAS v11.2

nas_image1

Old UI FreeNAS v9

nas_image2

Some basic hardware requirements to build a NAS server using FreeNAS:

  • 64-bit multicore processor
  • 8GB RAM
  • SSDs, SATADOMs or USB for Bootable device
  • SSDs recommended as cache memory for high speed reading and writing
  • Ethernet card Intel or Chelsio 1GbE or 10GbE
  • High-quality storage drive if possible to go for NAS drives that are special purpose drives for NAS

Introduction to Generative Adversarial Network(GAN): Artificial Artist

$
0
0

Overview

GAN_image1

“Whether you want to uncover the secrets of the universe, or just want to pursue a career in the 21st century, basic computer programming skills is the key to it.” ~ Stephen Hawking

John Romero had his own say, describing Programmers to be the Artists in their field. Logic-based Artists are what he referred to them.

That said, allow me to take this opportunity and introduce you to the latest trend in the field of Deep Learning, Here, I present to you Generative Adversarial Network (GAN) – The Most Interesting Idea in last 10 years in the field of Machine Learning, as famously said by Yann LeCun.

Generative Adversarial Networks (GANs) are deep neural net architectures comprised of the two networks, fighting one against the other (thus The “Adversarial”).

Introduction to GAN

GAN_image2

Let’s take an example to understand more in detail. Take a scenario, where you and your artist friend wants to get into the club but there are no passes available, so what will you do? Drop the idea and return back home! Obviously Not, Right? There’s is no way you can get a pass, so you and your friend decide to take an alternate route and fool the pass checker by mimicking the original pass.

GAN_image3

Your artist friend gets some ideas by seeing the original pass and mimics it with a copy of your own. At the first attempt, when you come across the pass checker for verifying it, you expect to get through but luck’s not running in your favor and your attempt to fool him goes in vain. Your artist friend doesn’t give up and takes this as a feedback and comes up with a few more ideas to improve the copied pass (Here, assume you have endless time to get into the club) and you both try again to get into the club.

GAN_image4

GAN introduction

What is a Generator?

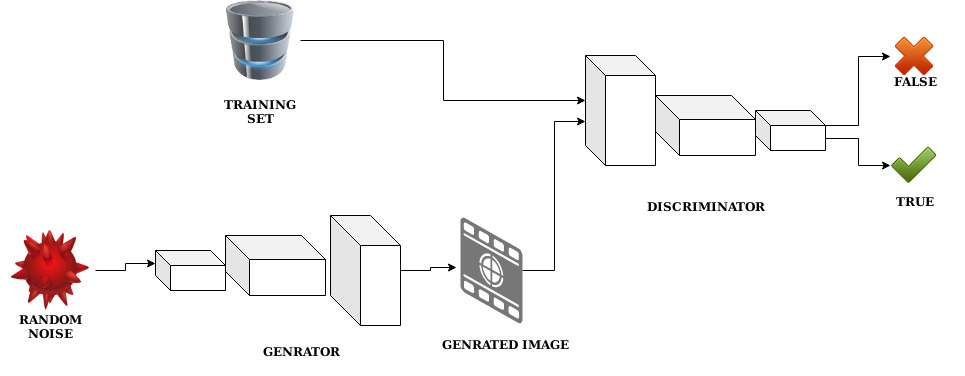
A Generator is basically a Neural Network that generates some images and tries to fool the Discriminator. The Generative Model in ML tries to predict a feature from a certain label. In the example shared above, your artist friend who generates the fake pass for getting into the club can be referred to as a Generator.

GAN_image5

What is Discriminator?

A Discriminator is like a verifier who verifies if the given image is from the training dataset or generated image. The Discriminative Model tries to predict the label from certain features. As per the verification performed, The Discriminator gives his feedback to the Generator. In the above example, the pass checker is like a Discriminator who checks, if the given pass is true or not.

GAN_image6

But how?

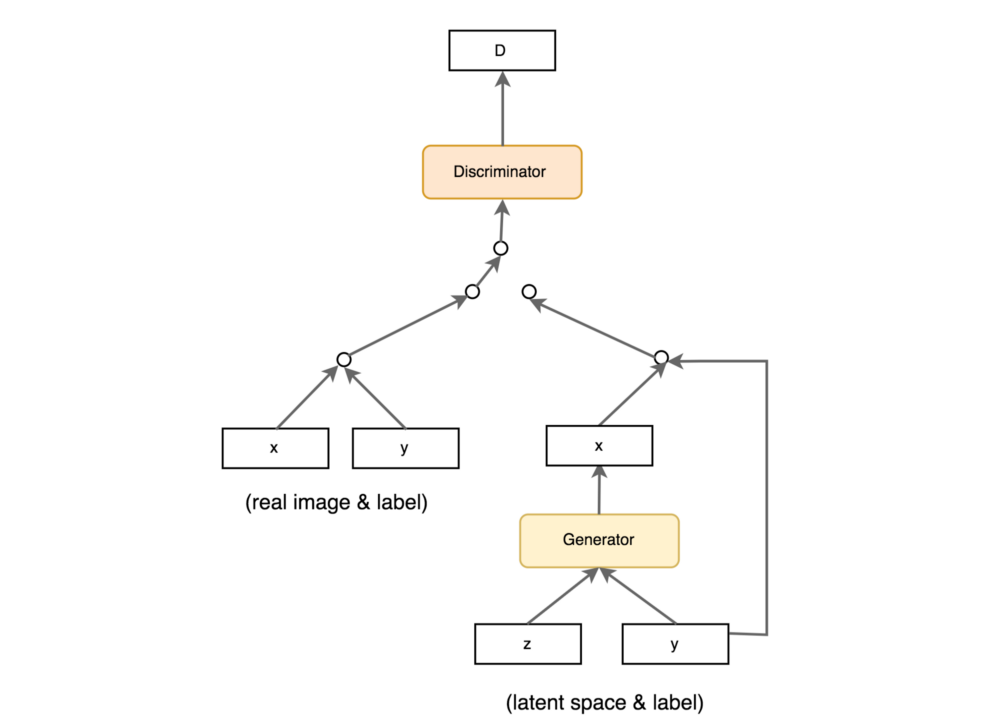
One Neural Network called Generator generates some image and gives it to another Neural Network (like classifier), that authenticates if the generated image is from the Generator or the given dataset.

If the Discriminator finds a fake image, it gives an error to the generator with some feedback. On the basis of the feedback received from the discriminator, the generator will generate some new image and then again send it back to the discriminator for authentication. And this loop will continue until a given dataset and the generated image doesn’t differ.

Now let me give you an introduction to some of the cool and magical applications of GAN.

Applications of GAN

CGAN:

The main idea behind Conditional Generative Adversarial Network (CGAN) is that the generative and discriminative both should have conditional settings. As a result, the ideal model can learn a Multi-Modal Mapping from inputs to outputs by feeding it with different contextual information.

GAN_image7

STACK GAN:

Stack GAN is used for generating a high-quality image from a given text description. If you train your model with birds labeled dataset and then give any text input, then Stack GAN gives a high-quality image from the given input description from the user.

GAN_image8

DISCO GAN:

Discover Cross-Domain Relations with Generative Adversarial Networks(Disco GANS) learns to discover relations between different domains, by using that relation GAN can style transfer from one to another domain.

DISCO GAN transfer your favorite purse style to your shoes, COOOOL. 🙂

GAN_image9

Now you understand GAN artistic capabilities, there are a few more interesting applications such as

  • Black and White Image to Colour Image Translation
  • Style Transfer one image to another
  • Blur Image to Clear Image
  • Music Generation
  • Cartoon Character Generation
  • Image Generation

And many more applications where we can use GAN. Cool isn’t it?

GAN_image10

Conclusion

From now onwards you can think of a computer as an artist. In this blog, I have explained what is GAN at a very basic level of understanding by describing some of its concepts and its applications.
So till this point, we have learned about the basics of GAN, how Generator and Discriminator work together & create some cool artificial artistic artwork based on a given input. I will explain in more detail depth from a beginner level in my upcoming blog. Wait for it 🙂


Stack: flexbox for designer

$
0
0

Overview

Hello friends, hope you all are ready to dive into some enthralling topic i.e “Stack” for designers. What are doing in your daily regime? Obviously, the answer would be designing. Create consistent and compatible Sketch designs with Stacks. Stacks permit you to create your design structured, constant and anticipated by dominating how layers are created, straightened, and resized based on the other layers within the same Stack. Then I think “Anima” is the toolkit that you are looking for.

FLEXBOX_image1

Introduction

The Anima Toolkit is a wide set of plugins for the Sketch app. Once you are friendly with Anima Toolkit, you’ll continue using it regularly in daily life because it makes your workflow very convenient. One main powerful piece of your designing, efficiency, will be constant and huge projects can be completed within a short timeline.

FLEXBOX_image2

What is the relation between bootstrap4 & anima toolkit?

Bootstrap is a free front-end framework for faster & easier web development. Bootstrap also gives you the ability to easily create responsive designs. The bootstrap grid system is built with flexbox in the updated version and allows up to 12 columns across the page.
Similarly, the designer also follows this grid across the layout. Now the question arises is that “What is flexbox?” Front end developers are very well aware of it and use it regularly while designing a site. But what about Designers? Don’t Worry. We are also using flexbox at the time of designing. The designer is now Using Anima Toolkit For Sketch Plugin. This toolkit includes the flexbox concept for a designer in a sketch app.
In anima toolkit, there are three properties:- Layout, Prototype & Export.

What is Flexbox?

FLEXBOX_image3

The Flexbox is a new and pretty good CSS layout module, but designers have no relation with the coding part. In contradiction, there’s relatively little detail on how flexbox can be used by the designer-developer to solve everyday layout problems? The flexbox has three features that are fundamental to design, but which have been difficult or impossible to achieve in CSS: alignment, distribution, and ordering. The Flexbox is pretty good adaptability to play a vital role. It gives your design easy to maintain alignment, ordering, spacing, direction and collapsing.

What is Stack as flexbox for a sketch?

FLEXBOX_image4

Stack out for layout sketch plugin. Now, we are working similar to the developer. Stack allows you to work with flexbox which is similar to re-arrange the elements, resize the elements, & everything working in a dynamic way. It has two directions of mode i.e horizontally and vertically. The Alignment is the top, center, spread, & bottom.
For Example:- If you are resizing one element in the grid then the rest of the elements are resized automatically at those respective positions. You can also rearrange one element inside one row. If you move the row of elements to re-arrange with a different row of elements then the other elements itself will also move according to the layout.
It works similarly like flexbox CSS, UI Structure, IOS & Android.

What is a Stack?

Stacks Builds compatible Sketch designs. It works like Flexbox for designers.
The Stacks allows you to make your design structured, uniform, consistent, and foreseen by managing how layers are massed, aligned, and resized based on other layers within the same Stack.
A Stack is a special type of Group that defines the layout of its child Layers.

How does it work?

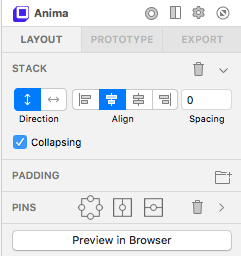
To Stack layers or groups, select them and click the Stack button in Layout panel.

FLEXBOX_image5

Layout Panel

What are the Stack Properties?

A Stack has 3 properties:

  1. Direction
  2. Alignment
  3. Spacing

FLEXBOX_image6

Stack Properties
1. Direction:

If stacking of child Layers is Horizontal or Vertical.

FLEXBOX_image7

Direction
2. Alignment:

The alignment is Top/Center/Spread/Bottom.

FLEXBOX_image8

Alignment
3. Spacing:

It defines the spacing between each child Layer.

FLEXBOX_image9

Spacing

What is Collapsing?

When you hide a layer or override a symbol to ‘none’, the stack will ignore it while rearranging the other layers.
Notice how in the example below, the Body Layer replaces the space of the hidden Subtitle Layer when collapsing is checked in.

FLEXBOX_image10

Collapsing

What is Nested Stack?

First of all, you need to enable the nested option from the anima toolkit.

FLEXBOX_image11

Enable Padding and Stack for Nested Symbols
Stacks can be nested within the stacks.

FLEXBOX_image12

Nested Stack

Conclusion

Yeahhhhh! Now I am pretty sure you have that much knowledge of Stack (Flexbox) of anima toolkit, that you can proudly share it with your friends and colleagues who aren’t aware of it.
We hope this blog satisfied you and we are ready to help you out. If you are interested to know more about Other Properties of Anima Toolkit stay tuned for the next blog!

Padding & Pins:- Anima Toolkit For Sketch To HTML

$
0
0

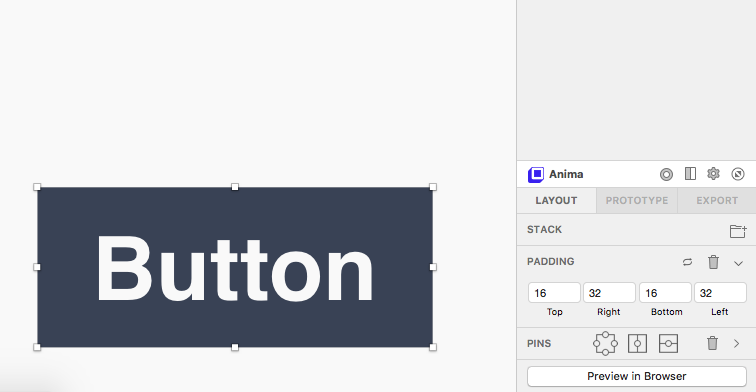
Overview

Hello Friends, are you in the designing world right? So, are you bored to adjust the padding of the element in designing tool? If you change the size of the button then you need to change padding from every side top, right, bottom, left, Right? Now through Padding & Pins feature of anima toolkit give you quick result. Once you set the Padding to any element then it will be used to make your design easy and flexible. We have to design so many screens within a very short time. So let us make it easy to play with reusable elements and objects with the help of very smart and recognition Anima Toolkit for the sketch app.

Introduction

The anima toolkit is the sketch app plugin. Nowadays Anima toolkit is a convenient way to deal with the arrangement of the elements. Using the anima toolkit, the designer can now take control of UI. Before Anima, adjustment of the object in width and height are difficult to change every time. Advanced using anima padding & pins feature easy your work to design flow of project with lots of elements.

Anima Toolkit

As you all got aware of Anima toolkit in the previous blog.
It works right inside Sketch, on your existing designs.

amina_img1

What is Layout?

The layout is the dominant engine inside the sketch. this helps you in many ways. through this, you can perform such operation like- Stack, Padding & Pins. In the earlier blog, we already understand What is stack? now It’s time to learn padding & pins.
The layout is an Anima toolkit feature that allows designers to build responsive designs inside Sketch.

There three properties:-

1) STACK:-

We have already understood this in the previous Blog.

2) PADDING:-

No more trials to suggest spacing. Make your buttons dynamic by using Padding. Padding makes your buttons resize themselves automatically based on their content. No more playing trial and error with hundreds of buttons that have to be resized each on its own. Simply set Padding once, and Anima will take care of the rest.

amina_img2

What is Padding?

Padding means that when you change the content, the background changes dynamically with it. It works great when used with Stacks, Pins, and inside Symbols.

amina_img3

Padding Control?

Click the Padding input toggle 🔁 or click below the Padding values to switch input modes(top, right, bottom, left).
Click & drag a label to adjust the Padding values.
It automatically adjusts your padding according to text size.

amina_img4

For Example, you are going to design a dynamic button for a layout. Use the padding of anima toolkit. It works as an adjustable element. Suppose you give Padding to top: 16, Right:32, Bottom:16, Left:32. Then you can enter any length of text in the rectangle, it adjusts automatically according to text.

amina_img5

3) PINS:-

Move to guess playing the game. Define exactly how your design looks on all screen sizes. Create responsive Artboards and Symbols. Boost Sketch resizing tools with the most robust and innovative layout engine. Use Pins to pin layers by pixels or by percent, and cover the infinite number of screens that actually exist in the real world. Get the power of code without coding, right inside the Sketch app.

amina_img6

What are the Pins?

Pins allow you to pin a Layer to its Parent with the following:

  • Top
  • Right
  • Bottom
  • Left
  • Center Horizontally
  • Center Vertically

Pins work like Constraint.

amina_img7

Example:- There are four sides of pins top, right, bottom & left. The pins have two directions vertically & horizontally. You can also set the width & height of the component. If you are moving the object from any four sides, or to any direction the spacing of the pins remains constant. the width and height also remain constant. the pins give you accurate & consistency result about the spacing.

amina_img8

Noted:- You can get a better idea of this topic more deeply through the below link.
https://docs.animaapp.com/v3/layout/03-pins.html

Conclusion

Yeahhhhh! Now I am pretty sure you have that much knowledge of Padding and Pins of anima toolkit, that you can proudly share it with your friends and colleagues who aren’t aware of it.

We hope this blog satisfied you and we are ready to help you out. If you are interested to know more about Other Properties of Anima Toolkit stay tuned for the next blog!

Prototype & Export:- Anima Toolkit For Sketch To HTML

$
0
0

Overview

Hello friends, hope you all are ready to dive into some fascinating topic i.e “Coding” for designers. What are doing in your daily regime? Obviously, the answer would be designing, having a conversation with the superior about the workflow and later on the end of the day handing over your work to either to your superior or client. Are you interested to develop your coding skills? Then I think “Anima” is the toolkit that you are looking for.

Introduction

The anima toolkit is the sketch app plugin. Nowadays Anima toolkit is a convenient way to communicate with the developers. So, are you excited to learn code directly from designing tool? We have to make sure about the responsive design as well as run it to check the design in a responsive browser with the help of very smart and gratitude Anima Toolkit for the sketch. Using the anima toolkit, the designer can now take control of UI. Before Anima, Advanced responsive layouts were only possible to check by using coding. But the latest version 3.0 of anima brings the power of the export coding from the sketch. No coding but with a new generation of visual tools.

This is a Skillful idea with or without coding skills, without the need for coding in designer life. It is called Anima Toolkit for the sketch app.

Prototype

The prototype is used to test UI/UX without proceeding into a development process. The responsive Layouts, Interactive Components, Animations, Videos, Forms and many More. All this being is created with a perceptible interface inside the Sketch app.

Prototype_image1

There are three properties of the prototype:-

1. Flow:-

The flow is used to link the artboard or breakpoint to any component.

Links:-

There are two types of links are External link & Backlink to the element. The External link is used for the outsourcing operation. In the external link, you can copy any link from outside and paste it. When you click on a component which is connected to external link the target action will be denominated. You can quickly join links to define the complete flow of your project. We define the project flow with the links between screens. You can also link to other websites. If you need to connect your company profile through Instagram, Facebook, Linkedin, etc.

Prototype_image2

Prototype_image3

2. Breakpoints:-

The Breakpoints is used to share a single link that just works for mobile, tablet, or desktop. Create a responsive design that fits all screen sizes. Simply connect multiple artboards to say that they are actually the same screen. It’s that easy. Share the same prototype for all platforms – mobile, tablet, and even multiple desktop sizes.

Prototype_image4

3. Set as Home:-

You can set the artboard as a default home screen for every time.

Smart Layers

You can perform your Prototype quickly with Smart Layers.
Smart Layers will help you to design your realistic prototypes with a few clicks. Perform live forms with real input fields. Add Hover effects and animations to the fields. Embed videos, GIFs, and also HTML code.

Prototype_image5

Interaction

You can quickly create your interaction with elements in a sketch app.

Note:- You can get a better vision on this by going through the below link:
https://medium.com/sketch-app-sources/timeline-2-0-interaction-design-for-sketch-f6fc0a852c8a

Prototype_image6

Export

Let’s share your experience with the fantasy of anima toolkit features with your colleague. Rather than sharing screenshots, hot-spots, prototypes, it is better to share ideas with people which they can experience.
Make your developers laugh 🙂 When they notice that you are exporting code with just a single click.
Handoff the most precise and specific design specs. Welcome your developers to observe the original code that executes your High-Fidelity Prototype run. Anima Toolkit specs include Flexbox, Padding, Animation Timing Functions and more.

Ready to go beyond the prototyping phase?
Export HTML/CSS/JS file and run fast and go to live it!
Export fully responsive, and interactive websites from your high-fidelity prototypes.
Handoff your design code to the development team :), or host your website with anima toolkit – no developers needed.
Exports are pure HTML / CSS / JS with no dependencies.

You Love to Host?
You can Publish your websites directly from Sketch with Anima plugin. No coding required.
Using Anima, your Sketch design is a few clicks away from publishing a live website. It’s that easy. Updating your website is just another click away.

Prototype_image7

Conclusion

Yeahhhhh! Now I am pretty sure you have that much knowledge of Prototype & Export of anima toolkit, that you can proudly share it with your friends and colleagues who aren’t aware of it.
We hope this blog satisfied you and we are ready to help you out.

A minute on the Internet (2019)

$
0
0

In here to discuss what is happening on the internet per minute in 2019.

The internet is everywhere. No, I don’t mean it hypothetically, it actually is! If you don’t believe me, then according to statistics almost 26.66 billion devices were active on the internet in 2019. Told you internet is everywhere and you might not even believe me if I tell you that you can get high-speed internet connection on Mount Everest.! Also in all these years, we have produced around 30+ zettabytes of data, yeah, so that would be around 3 billion of 12TB HDDs. Yeah, I know all these facts are brutal.

internet_image1

Stick till the end of the blog to know something interesting like a secret.
If I would ask you what are the things you can do within one minute, surely there will be many things but nothing much significant. Let’s face it we can’t even take a good selfie in a minute! All puns intended!. Well, there is this giant whose weight is claimed to be equivalent to that of a strawberry that can do A LOT, I mean really A LOT in a minute i.e just 60 seconds. Yes, we call it “The Internet”. A place where most of us spend more than a quarter of our life on the internet.

We have all heard of the quote “Data never sleeps”. But what does it mean? That when you sleep peacefully there’s someone up all night who keep collecting data so you can spend your life scrolling and surfing. But how hard do the internet works? The Internet Requires Approximately 90 Billion Horsepower each year in Electricity. I can only imagine. So what does the internet do in a minute? It’s much more huge than you think.

In the image below you can find out what’s happening on the internet in 60 seconds in 2019.

internet_image2_n

Shocking!!! Isn’t it!?

Just to revise figures and make it more clear:

internet_image3_n

So, If million of requests, transfers, and transactions are done every 60 seconds then in a day it would be around billions and trillions in a year. Yes! Trillion! Whatsapp sends around 102 trillion messages every year. In digit, it around 102,000,000,000,000. Insane, right?

internet_image4

There are websites on the internet that claims to show live count every of every second If you want to check out, you may find it here and here.

You know what China has a treatment/ rehabilitation center for people addicted to the internet! I’m going to sign up. Anyone wanna join?
.
.
.
Guess it’s just me then.

internet_image5

Secret Tip: The internet is protected by seven or fourteen people in the world who holds seven keys to the internet and they can restore the internet in case of a catastrophe! If you already knew this, what a genius!. If you want to know more, you may google it! And write us back if you find something interesting!

What is Openchain?

$
0
0

Overview

Hello Blockchain Enthusiast. Are you excited to learn about a new platform having similar characteristics such as Blockchain? Today we are going to discover a new platform Openchain. You can call it a cousin of Blockchain Technology. In this blog we are going to see the features of Openchain in brief.

What is Openchain?

Openchain is open to all distributed ledger technology. Openchain is used by organizations who want to issue and manage digital assets in a secure, robust and scalable way.

Openchain is not “Blockchain”, but it is a close cousin of Blockchain that falls under the umbrella of Blockchain Technology.

Confused ????
Don’t be. Let’s dive deeper.

Openchain_image1

Openchain does not create blocks for storing transactions. Transactions are directly linked to each other in Openchain.

Openchain can be a sidechain of bitcoin. How? Let’s try to understand that.
We can use the paging module to create a bridge between Bitcoin Blockchain and Openchain instance. When Bitcoins are set to a specific address, we can create proxy

of that on Openchain instance. Later on this proxy we use for redeem that bitcoins from main chain(Bitcoin Blockchain). So, we can say Openchain is act like sidechain in this scenario.
ZZZzzzzzzzz 😴

Openchain_image2

Bored?
I assure you it would be interesting once you learn about the features.

Features of Openchain

I myself became a fan of this Blockchain’s cousin after learning about its features.

Openchain_image3

Seriously! I am not joking and I am sure that you are also going to love features of Openchain.
So, here we go…

1. Instant Confirmation of Transaction

Openchain data structure depends on protocol buffers. Openchain contains mutation and Record for transaction. Mutation is a set of records that automatically modify the state of the data and this mutation is serialized by Mutation Protocol Buffers schema. Openchain Directly links transactions to one another so obviously transaction speed is faster than other Blockchains.

2. No Mining Fees

In Openchain, Server nodes have basically two types of mode.

  1. Validator mode
  2. Observe mode

In Validator Mode, the node accepts the transaction and validates them. Rules can be customized to validate or invalid for the transaction.
So in short there is no block mechanism involved in Openchain & hence no need to mine the blocks and therefore no transaction fees.

3. Extremely High Scalable

Because of its ledger structure and validation nodes it is highly scalable.

4. Secured Through Digital Signature

Transaction is done through mutation, timestamp and metadata. In Metadata it contains arbitrary metadata to be stored in mutation. And this is contain digital signature of the mutation by the required parties.

5. Immutability

Openchain_image4

As I mentioned above that transactions are directly linked to each other. By linking to each other it generates immutability of transaction history.

6. Assign Aliases Instead of Using Base-58 Addresses

Simplify the user experience by assigning aliases instead of remembering base-58 generated random characters string.

7. Multiple Levels of Control

This feature makes the user to enthusiasm to adopting Openchain instead of another Blockchain.
There are three types of access roles for the user who wants to join Openchain.

  1. The fully open ledger that anyone can join.
  2. Closer loop ledger in which the user must be approved by the administrator.
  3. Mix of above two, where permission users have more rights than other anonymous users.

Openchain_image5

Just a few more to goooooo!!!!!!

8. Hierarchical Account System

Openchain uses a hierarchy of accounts similar to file systems. That added more interesting account management options that other Blockchain doesn’t have.

Openchain_image6

9. Transparency and Auditability

Transactions are easily identified by timestamps and mutation digital signature that brings help for fast Transparency and Auditability.

10. Handle Loss and Theft

If fraudulent transactions have happened in the realtime, the administrator can create a new transaction representing the opposite transfer and by this we can remove fraudulent transactions.
Private keys are sent to end user directly without any loss.

11. Multiple Openchain instances

As described above, in observe mode the nodes are connected to the upstream node, and real time transaction are downloaded using the transaction stream. All the observers must have the same copy of the state of data held by the verifying node.

Openchain_image7

Conclusion

So guys today we learnt about a new technology, Openchain – What it is, how its features are different from other Blockchains. There’s a lot more to learn on Openchain. Stay tuned for my upcoming blog. Cheers!!

Viewing all 595 articles
Browse latest View live